PUN 2 के साथ एक मल्टीप्लेयर कार गेम बनाएं
Unity में मल्टीप्लेयर गेम बनाना एक जटिल कार्य है, लेकिन सौभाग्य से कई समाधान विकास प्रक्रिया को सरल बनाते हैं।
ऐसा ही एक समाधान फोटॉन नेटवर्क है। विशेष रूप से, उनके एपीआई की नवीनतम रिलीज़ जिसे PUN 2 कहा जाता है, सर्वर होस्टिंग का ख्याल रखती है और आपको अपनी इच्छानुसार मल्टीप्लेयर गेम बनाने के लिए स्वतंत्र छोड़ देती है।
इस ट्यूटोरियल में, मैं दिखाऊंगा कि PUN 2 का उपयोग करके भौतिकी सिंक्रनाइज़ेशन के साथ एक सरल कार गेम कैसे बनाया जाए।
Unity इस ट्यूटोरियल में प्रयुक्त संस्करण: Unity 2018.3.0f2 (64-बिट)
भाग 1: PUN 2 की स्थापना
पहला चरण Asset Store से PUN 2 पैकेज डाउनलोड करना है। इसमें मल्टीप्लेयर एकीकरण के लिए आवश्यक सभी स्क्रिप्ट और फ़ाइलें शामिल हैं।
- अपना Unity प्रोजेक्ट खोलें फिर Asset Store पर जाएं: (विंडो -> जनरल -> एसेटस्टोर) या Ctrl+9 दबाएं
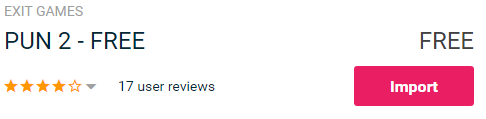
- "PUN 2- Free" खोजें, फिर पहले परिणाम पर क्लिक करें या यहां क्लिक करें
- डाउनलोड समाप्त होने के बाद PUN 2 पैकेज आयात करें

- पैकेज आयात होने के बाद आपको एक फोटॉन ऐप आईडी बनानी होगी, यह उनकी वेबसाइट पर किया जाता है: https://www.photonengine.com/
- एक नया खाता बनाएं (या अपने मौजूदा खाते में लॉग इन करें)
- प्रोफ़ाइल आइकन और फिर "Your Applications" पर क्लिक करके एप्लिकेशन पृष्ठ पर जाएं या इस लिंक का अनुसरण करें: https://dashboard.photonengine.com/en-US/PublicCloud
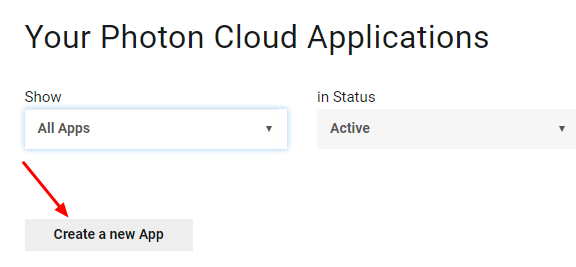
- एप्लिकेशन पृष्ठ पर क्लिक करें "Create new app"
- निर्माण पृष्ठ पर, फोटॉन प्रकार के लिए "Photon Realtime" चुनें और नाम के लिए, कोई भी नाम टाइप करें और फिर क्लिक करें "Create"

जैसा कि आप देख सकते हैं, एप्लिकेशन निःशुल्क योजना पर डिफ़ॉल्ट है। आप मूल्य निर्धारण योजनाओं के बारे में अधिक जानकारी यहां पढ़ सकते हैं
- एक बार एप्लिकेशन बन जाने के बाद, ऐप नाम के नीचे स्थित ऐप आईडी को कॉपी करें

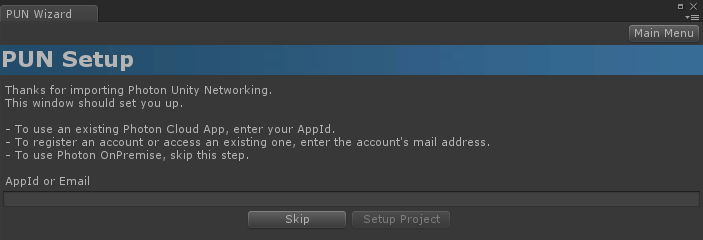
- अपने Unity प्रोजेक्ट पर वापस जाएँ फिर विंडो -> फोटॉन Unity नेटवर्किंग -> PUN विज़ार्ड पर जाएँ
- PUN विज़ार्ड में "Setup Project" पर क्लिक करें, अपनी ऐप आईडी पेस्ट करें और फिर क्लिक करें "Setup Project"
PUN 2 अब तैयार है!
भाग 2: एक मल्टीप्लेयर कार गेम बनाना
1. लॉबी की स्थापना
आइए एक लॉबी दृश्य बनाकर शुरुआत करें जिसमें लॉबी तर्क शामिल होगा (मौजूदा कमरों को ब्राउज़ करना, नए कमरे बनाना, आदि):
- एक नया दृश्य बनाएं और उसे कॉल करें "GameLobby"
- "GameLobby" दृश्य में एक नया गेमऑब्जेक्ट बनाएं और उसे कॉल करें "_GameLobby"
- एक नई C# स्क्रिप्ट बनाएं और इसे "PUN2_GameLobby" कहें, फिर इसे "_GameLobby" ऑब्जेक्ट के साथ संलग्न करें
- नीचे दिए गए कोड को "PUN2_GameLobby" स्क्रिप्ट के अंदर चिपकाएँ
PUN2_GameLobby.cs
using System.Collections.Generic;
using UnityEngine;
using Photon.Pun;
using Photon.Realtime;

public class PUN2_GameLobby : MonoBehaviourPunCallbacks
{

    //Our player name
    string playerName = "Player 1";
    //Users are separated from each other by gameversion (which allows you to make breaking changes).
    string gameVersion = "1.0";
    //The list of created rooms
    List<RoomInfo> createdRooms = new List<RoomInfo>();
    //Use this name when creating a Room
    string roomName = "Room 1";
    Vector2 roomListScroll = Vector2.zero;
    bool joiningRoom = false;

    // Use this for initialization
    void Start()
    {
        //Initialize Player name
        playerName = "Player " + Random.Range(111, 999);

        //This makes sure we can use PhotonNetwork.LoadLevel() on the master client and all clients in the same room sync their level automatically
        PhotonNetwork.AutomaticallySyncScene = true;

        if (!PhotonNetwork.IsConnected)
        {
            //Set the App version before connecting
            PhotonNetwork.PhotonServerSettings.AppSettings.AppVersion = gameVersion;
            PhotonNetwork.PhotonServerSettings.AppSettings.FixedRegion = "eu";
            // Connect to the photon master-server. We use the settings saved in PhotonServerSettings (a .asset file in this project)
            PhotonNetwork.ConnectUsingSettings();
        }
    }

    public override void OnDisconnected(DisconnectCause cause)
    {
        Debug.Log("OnFailedToConnectToPhoton. StatusCode: " + cause.ToString() + " ServerAddress: " + PhotonNetwork.ServerAddress);
    }

    public override void OnConnectedToMaster()
    {
        Debug.Log("OnConnectedToMaster");
        //After we connected to Master server, join the Lobby
        PhotonNetwork.JoinLobby(TypedLobby.Default);
    }

    public override void OnRoomListUpdate(List<RoomInfo> roomList)
    {
        Debug.Log("We have received the Room list");
        //After this callback, update the room list
        createdRooms = roomList;
    }

    void OnGUI()
    {
        GUI.Window(0, new Rect(Screen.width / 2 - 450, Screen.height / 2 - 200, 900, 400), LobbyWindow, "Lobby");
    }

    void LobbyWindow(int index)
    {
        //Connection Status and Room creation Button
        GUILayout.BeginHorizontal();

        GUILayout.Label("Status: " + PhotonNetwork.NetworkClientState);

        if (joiningRoom || !PhotonNetwork.IsConnected || PhotonNetwork.NetworkClientState != ClientState.JoinedLobby)
        {
            GUI.enabled = false;
        }

        GUILayout.FlexibleSpace();

        //Room name text field
        roomName = GUILayout.TextField(roomName, GUILayout.Width(250));

        if (GUILayout.Button("Create Room", GUILayout.Width(125)))
        {
            if (roomName != "")
            {
                joiningRoom = true;

                RoomOptions roomOptions = new RoomOptions();
                roomOptions.IsOpen = true;
                roomOptions.IsVisible = true;
                roomOptions.MaxPlayers = (byte)10; //Set any number

                PhotonNetwork.JoinOrCreateRoom(roomName, roomOptions, TypedLobby.Default);
            }
        }

        GUILayout.EndHorizontal();

        //Scroll through available rooms
        roomListScroll = GUILayout.BeginScrollView(roomListScroll, true, true);

        if (createdRooms.Count == 0)
        {
            GUILayout.Label("No Rooms were created yet...");
        }
        else
        {
            for (int i = 0; i < createdRooms.Count; i++)
            {
                GUILayout.BeginHorizontal("box");
                GUILayout.Label(createdRooms[i].Name, GUILayout.Width(400));
                GUILayout.Label(createdRooms[i].PlayerCount + "/" + createdRooms[i].MaxPlayers);

                GUILayout.FlexibleSpace();

                if (GUILayout.Button("Join Room"))
                {
                    joiningRoom = true;

                    //Set our Player name
                    PhotonNetwork.NickName = playerName;

                    //Join the Room
                    PhotonNetwork.JoinRoom(createdRooms[i].Name);
                }
                GUILayout.EndHorizontal();
            }
        }

        GUILayout.EndScrollView();

        //Set player name and Refresh Room button
        GUILayout.BeginHorizontal();

        GUILayout.Label("Player Name: ", GUILayout.Width(85));
        //Player name text field
        playerName = GUILayout.TextField(playerName, GUILayout.Width(250));

        GUILayout.FlexibleSpace();

        GUI.enabled = (PhotonNetwork.NetworkClientState == ClientState.JoinedLobby || PhotonNetwork.NetworkClientState == ClientState.Disconnected) && !joiningRoom;
        if (GUILayout.Button("Refresh", GUILayout.Width(100)))
        {
            if (PhotonNetwork.IsConnected)
            {
                //Re-join Lobby to get the latest Room list
                PhotonNetwork.JoinLobby(TypedLobby.Default);
            }
            else
            {
                //We are not connected, estabilish a new connection
                PhotonNetwork.ConnectUsingSettings();
            }
        }

        GUILayout.EndHorizontal();

        if (joiningRoom)
        {
            GUI.enabled = true;
            GUI.Label(new Rect(900 / 2 - 50, 400 / 2 - 10, 100, 20), "Connecting...");
        }
    }

    public override void OnCreateRoomFailed(short returnCode, string message)
    {
        Debug.Log("OnCreateRoomFailed got called. This can happen if the room exists (even if not visible). Try another room name.");
        joiningRoom = false;
    }

    public override void OnJoinRoomFailed(short returnCode, string message)
    {
        Debug.Log("OnJoinRoomFailed got called. This can happen if the room is not existing or full or closed.");
        joiningRoom = false;
    }

    public override void OnJoinRandomFailed(short returnCode, string message)
    {
        Debug.Log("OnJoinRandomFailed got called. This can happen if the room is not existing or full or closed.");
        joiningRoom = false;
    }

    public override void OnCreatedRoom()
    {
        Debug.Log("OnCreatedRoom");
        //Set our player name
        PhotonNetwork.NickName = playerName;
        //Load the Scene called Playground (Make sure it's added to build settings)
        PhotonNetwork.LoadLevel("Playground");
    }

    public override void OnJoinedRoom()
    {
        Debug.Log("OnJoinedRoom");
    }
}
2. एक कार प्रीफैब बनाना
कार प्रीफ़ैब एक साधारण भौतिकी नियंत्रक का उपयोग करेगा।
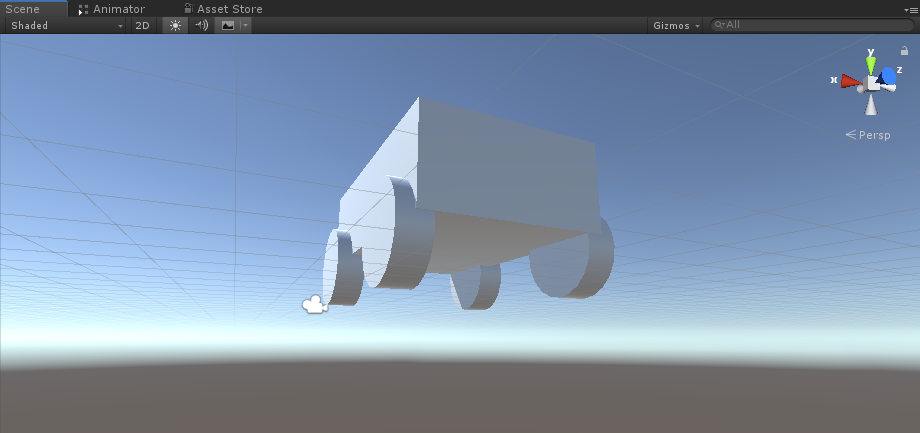
- एक नया गेमऑब्जेक्ट बनाएं और उसे कॉल करें "CarRoot"
- एक नया क्यूब बनाएं और इसे "CarRoot" ऑब्जेक्ट के अंदर ले जाएं, फिर इसे Z और X-अक्ष के साथ स्केल करें

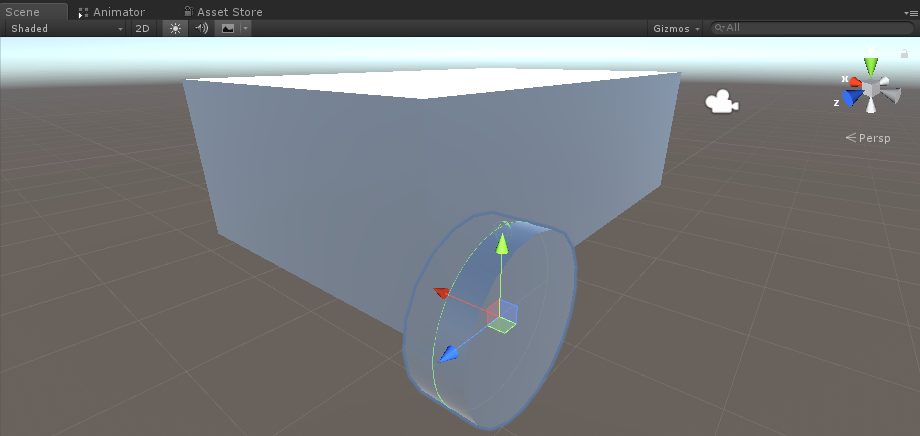
- एक नया गेमऑब्जेक्ट बनाएं और इसे "wfl" नाम दें (व्हील फ्रंट लेफ्ट का संक्षिप्त नाम)
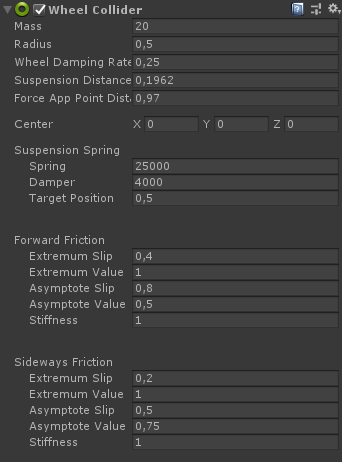
- "wfl" ऑब्जेक्ट में व्हील कोलाइडर घटक जोड़ें और नीचे दी गई छवि से मान सेट करें:

- एक नया गेमऑब्जेक्ट बनाएं, इसका नाम बदलकर "WheelTransform" करें और फिर इसे "wfl" ऑब्जेक्ट के अंदर ले जाएं
- एक नया सिलेंडर बनाएं, इसे "WheelTransform" ऑब्जेक्ट के अंदर ले जाएं, फिर इसे घुमाएं और स्केल करें जब तक कि यह व्हील कोलाइडर आयामों से मेल न खाए। मेरे मामले में, पैमाना है (1, 0.17, 1)

- अंत में, बाकी पहियों के लिए "wfl" ऑब्जेक्ट को 3 बार डुप्लिकेट करें और प्रत्येक ऑब्जेक्ट का नाम क्रमशः "wfr" (व्हील फ्रंट राइट), "wrr" (व्हील रियर राइट), और "wrl" (व्हील रियर लेफ्ट) रखें।
- एक नई स्क्रिप्ट बनाएं, इसे "SC_CarController" कहें, फिर इसके अंदर नीचे दिया गया कोड पेस्ट करें:
SC_CarController.cs
using UnityEngine;
using System.Collections;

public class SC_CarController : MonoBehaviour
{
    public WheelCollider WheelFL;
    public WheelCollider WheelFR;
    public WheelCollider WheelRL;
    public WheelCollider WheelRR;
    public Transform WheelFLTrans;
    public Transform WheelFRTrans;
    public Transform WheelRLTrans;
    public Transform WheelRRTrans;
    public float steeringAngle = 45;
    public float maxTorque = 1000;
    public  float maxBrakeTorque = 500;
    public Transform centerOfMass;

    float gravity = 9.8f;
    bool braked = false;
    Rigidbody rb;

    void Start()
    {
        rb = GetComponent<Rigidbody>();
        rb.centerOfMass = centerOfMass.transform.localPosition;
    }

    void FixedUpdate()
    {
        if (!braked)
        {
            WheelFL.brakeTorque = 0;
            WheelFR.brakeTorque = 0;
            WheelRL.brakeTorque = 0;
            WheelRR.brakeTorque = 0;
        }
        //Speed of car, Car will move as you will provide the input to it.

        WheelRR.motorTorque = maxTorque * Input.GetAxis("Vertical");
        WheelRL.motorTorque = maxTorque * Input.GetAxis("Vertical");

        //Changing car direction
        //Here we are changing the steer angle of the front tyres of the car so that we can change the car direction.
        WheelFL.steerAngle = steeringAngle * Input.GetAxis("Horizontal");
        WheelFR.steerAngle = steeringAngle * Input.GetAxis("Horizontal");
    }
    void Update()
    {
        HandBrake();

        //For tyre rotate
        WheelFLTrans.Rotate(WheelFL.rpm / 60 * 360 * Time.deltaTime, 0, 0);
        WheelFRTrans.Rotate(WheelFR.rpm / 60 * 360 * Time.deltaTime, 0, 0);
        WheelRLTrans.Rotate(WheelRL.rpm / 60 * 360 * Time.deltaTime, 0, 0);
        WheelRRTrans.Rotate(WheelRL.rpm / 60 * 360 * Time.deltaTime, 0, 0);
        //Changing tyre direction
        Vector3 temp = WheelFLTrans.localEulerAngles;
        Vector3 temp1 = WheelFRTrans.localEulerAngles;
        temp.y = WheelFL.steerAngle - (WheelFLTrans.localEulerAngles.z);
        WheelFLTrans.localEulerAngles = temp;
        temp1.y = WheelFR.steerAngle - WheelFRTrans.localEulerAngles.z;
        WheelFRTrans.localEulerAngles = temp1;
    }
    void HandBrake()
    {
        //Debug.Log("brakes " + braked);
        if (Input.GetButton("Jump"))
        {
            braked = true;
        }
        else
        {
            braked = false;
        }
        if (braked)
        {

            WheelRL.brakeTorque = maxBrakeTorque * 20;//0000;
            WheelRR.brakeTorque = maxBrakeTorque * 20;//0000;
            WheelRL.motorTorque = 0;
            WheelRR.motorTorque = 0;
        }
    }
}- "CarRoot" ऑब्जेक्ट में SC_CarController स्क्रिप्ट संलग्न करें
- Rigidbody घटक को "CarRoot" ऑब्जेक्ट से जोड़ें और इसके द्रव्यमान को 1000 में बदलें
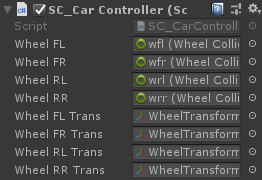
- SC_CarController में व्हील वेरिएबल्स असाइन करें (पहले 4 वेरिएबल्स के लिए व्हील कोलाइडर और बाकी 4 के लिए व्हीलट्रांसफॉर्म)
- सेंटर ऑफ मास वेरिएबल के लिए एक नया गेमऑब्जेक्ट बनाएं, इसे "CenterOfMass" पर कॉल करें और इसे "CarRoot" ऑब्जेक्ट के अंदर ले जाएं
- "CenterOfMass" ऑब्जेक्ट को बीच में और थोड़ा नीचे रखें, इस तरह:

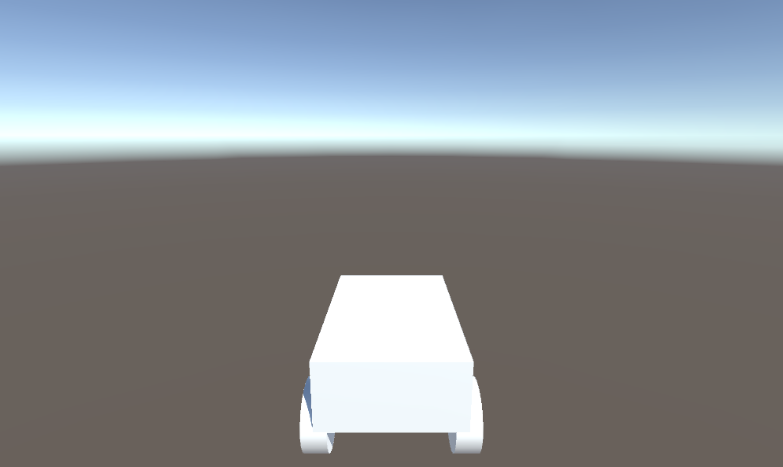
- अंत में परीक्षण उद्देश्यों के लिए मुख्य कैमरे को "CarRoot" ऑब्जेक्ट के अंदर ले जाएं और इसे कार की ओर इंगित करें:
- एक नई स्क्रिप्ट बनाएं, इसे "PUN2_CarSync" कहें, फिर इसके अंदर नीचे दिया गया कोड पेस्ट करें:
PUN2_CarSync.cs
using System.Collections;
using System.Collections.Generic;
using UnityEngine;
using Photon.Pun;

public class PUN2_CarSync : MonoBehaviourPun, IPunObservable
{
    public MonoBehaviour[] localScripts; //Scripts that should only be enabled for the local player (Ex. Car controller)
    public GameObject[] localObjects; //Objects that should only be active for the local player (Ex. Camera)
    public Transform[] wheels; //Car wheel transforms

    Rigidbody r;
    // Values that will be synced over network
    Vector3 latestPos;
    Quaternion latestRot;
    Vector3 latestVelocity;
    Vector3 latestAngularVelocity;
    Quaternion[] wheelRotations = new Quaternion[0];
    // Lag compensation
    float currentTime = 0;
    double currentPacketTime = 0;
    double lastPacketTime = 0;
    Vector3 positionAtLastPacket = Vector3.zero;
    Quaternion rotationAtLastPacket = Quaternion.identity;
    Vector3 velocityAtLastPacket = Vector3.zero;
    Vector3 angularVelocityAtLastPacket = Vector3.zero;

    // Use this for initialization
    void Awake()
    {
        r = GetComponent<Rigidbody>();
        r.isKinematic = !photonView.IsMine;
        for (int i = 0; i < localScripts.Length; i++)
        {
            localScripts[i].enabled = photonView.IsMine;
        }
        for (int i = 0; i < localObjects.Length; i++)
        {
            localObjects[i].SetActive(photonView.IsMine);
        }
    }

    public void OnPhotonSerializeView(PhotonStream stream, PhotonMessageInfo info)
    {
        if (stream.IsWriting)
        {
            // We own this player: send the others our data
            stream.SendNext(transform.position);
            stream.SendNext(transform.rotation);
            stream.SendNext(r.velocity);
            stream.SendNext(r.angularVelocity);

            wheelRotations = new Quaternion[wheels.Length];
            for(int i = 0; i < wheels.Length; i++)
            {
                wheelRotations[i] = wheels[i].localRotation;
            }
            stream.SendNext(wheelRotations);
        }
        else
        {
            // Network player, receive data
            latestPos = (Vector3)stream.ReceiveNext();
            latestRot = (Quaternion)stream.ReceiveNext();
            latestVelocity = (Vector3)stream.ReceiveNext();
            latestAngularVelocity = (Vector3)stream.ReceiveNext();
            wheelRotations = (Quaternion[])stream.ReceiveNext();

            // Lag compensation
            currentTime = 0.0f;
            lastPacketTime = currentPacketTime;
            currentPacketTime = info.SentServerTime;
            positionAtLastPacket = transform.position;
            rotationAtLastPacket = transform.rotation;
            velocityAtLastPacket = r.velocity;
            angularVelocityAtLastPacket = r.angularVelocity;
        }
    }

    // Update is called once per frame
    void Update()
    {
        if (!photonView.IsMine)
        {
            // Lag compensation
            double timeToReachGoal = currentPacketTime - lastPacketTime;
            currentTime += Time.deltaTime;

            // Update car position and velocity
            transform.position = Vector3.Lerp(positionAtLastPacket, latestPos, (float)(currentTime / timeToReachGoal));
            transform.rotation = Quaternion.Lerp(rotationAtLastPacket, latestRot, (float)(currentTime / timeToReachGoal));
            r.velocity = Vector3.Lerp(velocityAtLastPacket, latestVelocity, (float)(currentTime / timeToReachGoal));
            r.angularVelocity = Vector3.Lerp(angularVelocityAtLastPacket, latestAngularVelocity, (float)(currentTime / timeToReachGoal));

            //Apply wheel rotation
            if(wheelRotations.Length == wheels.Length)
            {
                for (int i = 0; i < wheelRotations.Length; i++)
                {
                    wheels[i].localRotation = Quaternion.Lerp(wheels[i].localRotation, wheelRotations[i], Time.deltaTime * 6.5f);
                }
            }
        }
    }
}- PUN2_CarSync स्क्रिप्ट को "CarRoot" ऑब्जेक्ट से जोड़ें
- "CarRoot" ऑब्जेक्ट में PhotonView घटक संलग्न करें
- PUN2_CarSync में SC_CarController स्क्रिप्ट को स्थानीय स्क्रिप्ट सरणी में असाइन करें
- PUN2_CarSync में कैमरा को स्थानीय ऑब्जेक्ट सरणी में असाइन करें
- व्हील्स ऐरे में व्हीलट्रांसफॉर्म ऑब्जेक्ट असाइन करें
- अंत में, PUN2_CarSync स्क्रिप्ट को फोटॉन व्यू में ऑब्जर्व्ड कंपोनेंट्स ऐरे में असाइन करें
- "CarRoot" ऑब्जेक्ट को प्रीफैब में सेव करें और इसे रिसोर्सेज नामक फ़ोल्डर में रखें (नेटवर्क पर ऑब्जेक्ट्स को स्पॉन करने में सक्षम होने के लिए यह आवश्यक है)
3. गेम लेवल बनाना
गेम लेवल एक दृश्य है जिसे रूम में शामिल होने के बाद लोड किया जाता है, जहां सभी गतिविधियां होती हैं।
- एक नया दृश्य बनाएं और इसे "Playground" कहें (या यदि आप एक अलग नाम रखना चाहते हैं, तो इस पंक्ति में नाम बदलना सुनिश्चित करें PhotonNetwork.LoadLevel('Playground'); PUN2_GameLobby.cs पर)।
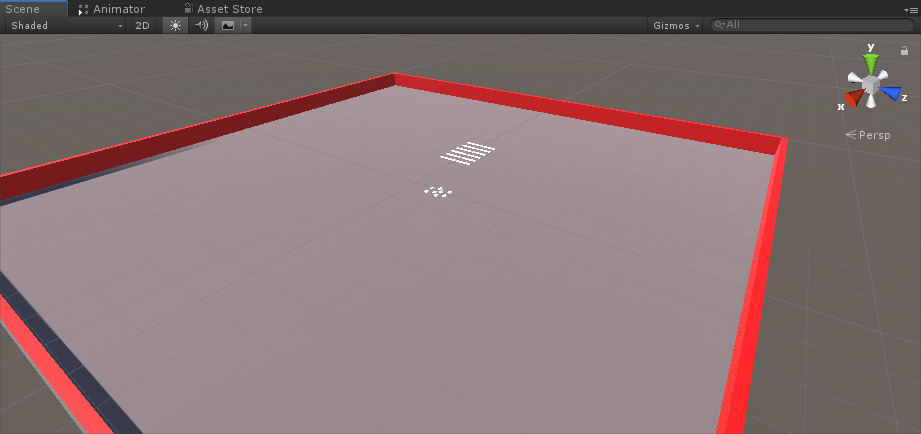
मेरे मामले में, मैं एक विमान और कुछ क्यूब्स के साथ एक साधारण दृश्य का उपयोग करूंगा:
- एक नई स्क्रिप्ट बनाएं और इसे PUN2_RoomController नाम दें (यह स्क्रिप्ट रूम के अंदर तर्क को संभालेगी, जैसे खिलाड़ियों को पैदा करना, खिलाड़ियों की सूची दिखाना आदि) फिर इसके अंदर नीचे दिए गए कोड को पेस्ट करें:
PUN2_RoomController.cs
using UnityEngine;
using Photon.Pun;

public class PUN2_RoomController : MonoBehaviourPunCallbacks
{

    //Player instance prefab, must be located in the Resources folder
    public GameObject playerPrefab;
    //Player spawn point
    public Transform[] spawnPoints;

    // Use this for initialization
    void Start()
    {
        //In case we started this demo with the wrong scene being active, simply load the menu scene
        if (PhotonNetwork.CurrentRoom == null)
        {
            Debug.Log("Is not in the room, returning back to Lobby");
            UnityEngine.SceneManagement.SceneManager.LoadScene("GameLobby");
            return;
        }

        //We're in a room. spawn a character for the local player. it gets synced by using PhotonNetwork.Instantiate
        PhotonNetwork.Instantiate(playerPrefab.name, spawnPoints[Random.Range(0, spawnPoints.Length - 1)].position, spawnPoints[Random.Range(0, spawnPoints.Length - 1)].rotation, 0);
    }

    void OnGUI()
    {
        if (PhotonNetwork.CurrentRoom == null)
            return;

        //Leave this Room
        if (GUI.Button(new Rect(5, 5, 125, 25), "Leave Room"))
        {
            PhotonNetwork.LeaveRoom();
        }

        //Show the Room name
        GUI.Label(new Rect(135, 5, 200, 25), PhotonNetwork.CurrentRoom.Name);

        //Show the list of the players connected to this Room
        for (int i = 0; i < PhotonNetwork.PlayerList.Length; i++)
        {
            //Show if this player is a Master Client. There can only be one Master Client per Room so use this to define the authoritative logic etc.)
            string isMasterClient = (PhotonNetwork.PlayerList[i].IsMasterClient ? ": MasterClient" : "");
            GUI.Label(new Rect(5, 35 + 30 * i, 200, 25), PhotonNetwork.PlayerList[i].NickName + isMasterClient);
        }
    }

    public override void OnLeftRoom()
    {
        //We have left the Room, return back to the GameLobby
        UnityEngine.SceneManagement.SceneManager.LoadScene("GameLobby");
    }
}- "Playground" दृश्य में एक नया गेमऑब्जेक्ट बनाएं और उसे कॉल करें "_RoomController"
- _RoomController ऑब्जेक्ट में PUN2_RoomController स्क्रिप्ट संलग्न करें
- एक कार प्रीफ़ैब और एक स्पॉनप्वाइंट असाइन करें, फिर दृश्य को सहेजें

- बिल्ड सेटिंग्स में गेमलॉबी और प्लेग्राउंड दोनों दृश्य जोड़ें:

4. एक टेस्ट बिल्ड बनाना
अब इसका निर्माण करने और उसका परीक्षण करने का समय आ गया है:

सब कुछ उम्मीद के मुताबिक काम करता है!