एकता में बवंडर भौतिकी बनाएं
इस ट्यूटोरियल में, हम Unity के अंदर एक टॉरनेडो सिमुलेशन बनाएंगे।
Unity इस ट्यूटोरियल में प्रयुक्त संस्करण: Unity 2018.3.0f2 (64-बिट)
चरण 1: सभी आवश्यक स्क्रिप्ट बनाएं
इस ट्यूटोरियल के लिए 2 स्क्रिप्ट की आवश्यकता है:
SC_Caught.cs
//This script is attached automatically to each Object caught in Tornado

using UnityEngine;

public class SC_Caught : MonoBehaviour
{
    private SC_Tornado tornadoReference;
    private SpringJoint spring;
    [HideInInspector]
    public Rigidbody rigid;

    // Use this for initialization
    void Start()
    {
        rigid = GetComponent<Rigidbody>();
    }

    // Update is called once per frame
    void Update()
    {
        //Lift spring so objects are pulled upwards
        Vector3 newPosition = spring.connectedAnchor;
        newPosition.y = transform.position.y;
        spring.connectedAnchor = newPosition;
    }

    void FixedUpdate()
    {
        //Rotate object around tornado center
        Vector3 direction = transform.position - tornadoReference.transform.position;
        //Project
        Vector3 projection = Vector3.ProjectOnPlane(direction, tornadoReference.GetRotationAxis());
        projection.Normalize();
        Vector3 normal = Quaternion.AngleAxis(130, tornadoReference.GetRotationAxis()) * projection;
        normal = Quaternion.AngleAxis(tornadoReference.lift, projection) * normal;
        rigid.AddForce(normal * tornadoReference.GetStrength(), ForceMode.Force);

        Debug.DrawRay(transform.position, normal * 10, Color.red);
    }

    //Call this when tornadoReference already exists
    public void Init(SC_Tornado tornadoRef, Rigidbody tornadoRigidbody, float springForce)
    {
        //Make sure this is enabled (for reentrance)
        enabled = true;

        //Save tornado reference
        tornadoReference = tornadoRef;

        //Initialize the spring
        spring = gameObject.AddComponent<SpringJoint>();
        spring.spring = springForce;
        spring.connectedBody = tornadoRigidbody;

        spring.autoConfigureConnectedAnchor = false;

        //Set initial position of the caught object relative to its position and the tornado
        Vector3 initialPosition = Vector3.zero;
        initialPosition.y = transform.position.y;
        spring.connectedAnchor = initialPosition;
    }

    public void Release()
    {
        enabled = false;
        Destroy(spring);
    }
}
SC_Tornado.cs
//Tornado script controls tornado physics

using System.Collections.Generic;
using UnityEngine;

public class SC_Tornado : MonoBehaviour
{
    [Tooltip("Distance after which the rotation physics starts")]
    public float maxDistance = 20;

    [Tooltip("The axis that the caught objects will rotate around")]
    public Vector3 rotationAxis = new Vector3(0, 1, 0);

    [Tooltip("Angle that is added to the object's velocity (higher lift -> quicker on top)")]
    [Range(0, 90)]
    public float lift = 45;

    [Tooltip("The force that will drive the caught objects around the tornado's center")]
    public float rotationStrength = 50;

    [Tooltip("Tornado pull force")]
    public float tornadoStrength = 2;

    Rigidbody r;

    List<SC_Caught> caughtObject = new List<SC_Caught>();

    // Start is called before the first frame update
    void Start()
    {
        //Normalize the rotation axis given by the user
        rotationAxis.Normalize();

        r = GetComponent<Rigidbody>();
        r.isKinematic = true;
    }

    void FixedUpdate()
    {
        //Apply force to caught objects
        for (int i = 0; i < caughtObject.Count; i++)
        {
            if(caughtObject[i] != null)
            {
                Vector3 pull = transform.position - caughtObject[i].transform.position;
                if (pull.magnitude > maxDistance)
                {
                    caughtObject[i].rigid.AddForce(pull.normalized * pull.magnitude, ForceMode.Force);
                    caughtObject[i].enabled = false;
                }
                else
                {
                    caughtObject[i].enabled = true;
                }
            }
        }
    }

    void OnTriggerEnter(Collider other)
    {
        if (!other.attachedRigidbody) return;
        if (other.attachedRigidbody.isKinematic) return;

        //Add caught object to the list
        SC_Caught caught = other.GetComponent<SC_Caught>();
        if (!caught)
        {
            caught = other.gameObject.AddComponent<SC_Caught>();
        }

        caught.Init(this, r, tornadoStrength);

        if (!caughtObject.Contains(caught))
        {
            caughtObject.Add(caught);
        }
    }

    void OnTriggerExit(Collider other)
    {
        //Release caught object
        SC_Caught caught = other.GetComponent<SC_Caught>();
        if (caught)
        {
            caught.Release();

            if (caughtObject.Contains(caught))
            {
                caughtObject.Remove(caught);
            }
        }
    }

    public float GetStrength()
    {
        return rotationStrength;
    }

    //The axis the caught objects rotate around
    public Vector3 GetRotationAxis()
    {
        return rotationAxis;
    }

    //Draw tornado radius circle in Editor
    void OnDrawGizmosSelected()
    {
        Vector3[] positions = new Vector3[30];
        Vector3 centrePos = transform.position;
        for (int pointNum = 0; pointNum < positions.Length; pointNum++)
        {
            // "i" now represents the progress around the circle from 0-1
            // we multiply by 1.0 to ensure we get a fraction as a result.
            float i = (float)(pointNum * 2) / positions.Length;

            // get the angle for this step (in radians, not degrees)
            float angle = i * Mathf.PI * 2;

            // the X & Y position for this angle are calculated using Sin & Cos
            float x = Mathf.Sin(angle) * maxDistance;
            float z = Mathf.Cos(angle) * maxDistance;

            Vector3 pos = new Vector3(x, 0, z) + centrePos;
            positions[pointNum] = pos;
        }

        Gizmos.color = Color.cyan;
        for (int i = 0; i < positions.Length; i++)
        {
            if (i == positions.Length - 1)
            {
                Gizmos.DrawLine(positions[0], positions[positions.Length - 1]);
            }
            else
            {
                Gizmos.DrawLine(positions[i], positions[i + 1]);
            }
        }
    }
}![]()
चरण 2: एक बवंडर बनाना
1. बवंडर कण बनाएं:
- एक नया गेमऑब्जेक्ट बनाएं (गेमऑब्जेक्ट -> खाली बनाएं) और इसे नाम दें "Tornado"
- एक अन्य गेमऑब्जेक्ट बनाएं और इसे "Particles" नाम दें, इसे "Tornado" के अंदर ले जाएं और इसकी स्थिति को (0, 0, 0) में बदलें।
- "Particles" गेमऑब्जेक्ट में एक पार्टिकलसिस्टम घटक जोड़ें
- पार्टिकल सिस्टम में इन मॉड्यूल को सक्षम करें: उत्सर्जन, आकार, जीवनकाल पर वेग, जीवनकाल पर रंग, जीवनकाल पर आकार , जीवनकाल में घूर्णन, बाहरी बल, रेंडरर।

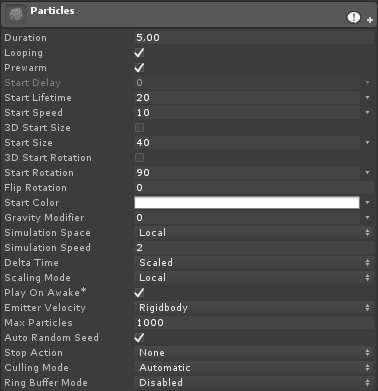
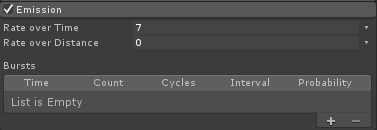
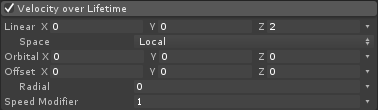
2. प्रत्येक कण सिस्टम मॉड्यूल के लिए मान निर्दिष्ट करें (नीचे स्क्रीनशॉट देखें):
मुख्य (कण) मॉड्यूल:
उत्सर्जन मॉड्यूल:
आकार मॉड्यूल:

लाइफटाइम मॉड्यूल पर वेग:
लाइफटाइम मॉड्यूल पर रंग:
![]()

(प्रत्येक सिरे पर 2 ग्रे रंग और भीतरी भाग में 2 सफेद रंग)
लाइफटाइम मॉड्यूल पर आकार:

(आकार ओवर लाइफटाइम एक वक्र का उपयोग करता है जो इस तरह दिखता है):
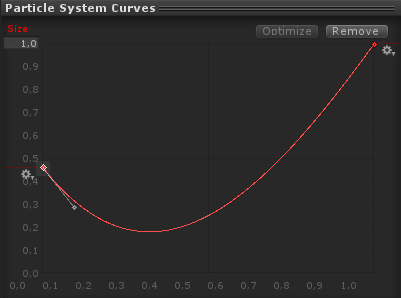
(आकार थोड़ा नीचे जाता है फिर बढ़ जाता है)
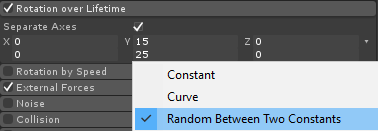
जीवनकाल पर घूर्णन:
बाहरी बल मॉड्यूल:
इस मॉड्यूल में किसी बदलाव की आवश्यकता नहीं है, बस डिफ़ॉल्ट मान छोड़ दें।
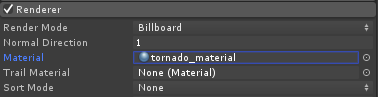
रेंडरर मॉड्यूल:
इस मॉड्यूल के लिए हमें केवल निम्नलिखित सामग्री आवंटित करने की आवश्यकता है:
- एक नई सामग्री बनाएं और उसे कॉल करें "tornado_material"
- इसके शेडर को बदलें "Legacy Shaders/Particles/Alpha Blended"
- इसे नीचे बनावट निर्दिष्ट करें (या यहां क्लिक करें):

- रेंडरर मॉड्यूल को Tornado_material असाइन करें:
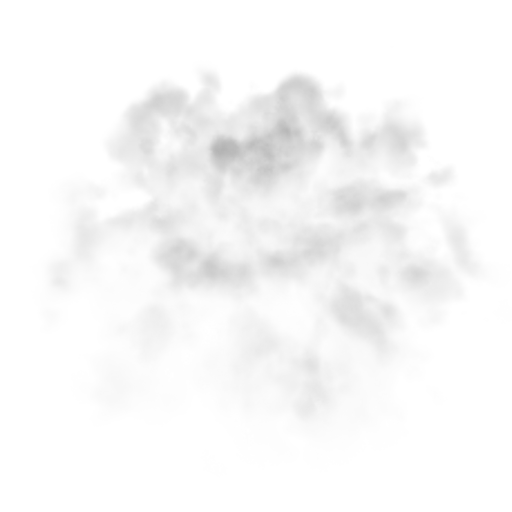
अब बवंडर के कण कुछ इस तरह दिखने चाहिए:
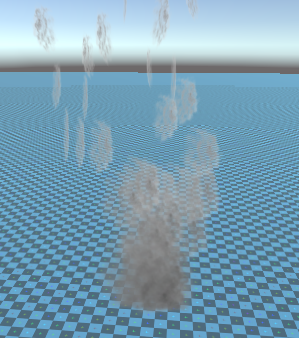
लेकिन जैसा कि आप देख सकते हैं कि यह बिल्कुल भी बवंडर जैसा नहीं दिखता है, ऐसा इसलिए है क्योंकि हमारे पास जोड़ने के लिए एक और घटक है, जो कण प्रणाली बल फ़ील्ड है, गोलाकार हवा का अनुकरण करने के लिए इस घटक की आवश्यकता है:
- एक नया गेमऑब्जेक्ट बनाएं और उसे नाम दें "ForceField"
- "ForceField" को "Tornado" गेमऑब्जेक्ट के अंदर ले जाएं और इसकी स्थिति को (0, 0, 0) में बदलें
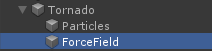
- इसमें पार्टिकल सिस्टम फ़ोर्स फ़ील्ड घटक जोड़ें "ForceField"
- फ़ोर्स फ़ील्ड घटक के मानों को नीचे स्क्रीनशॉट के समान बदलें:

अब कण कुछ इस तरह दिखने चाहिए, जो काफी बेहतर है:

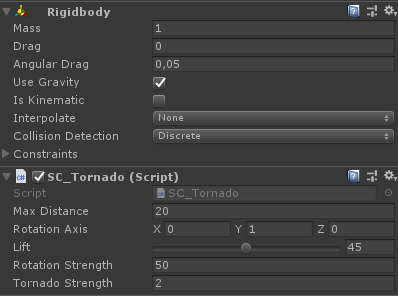
3. बवंडर भौतिकी की स्थापना
- "Tornado" GameObject में Rigidbody और SC_Tornado घटक जोड़ें
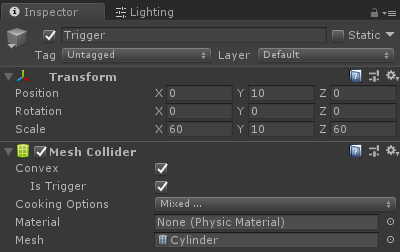
- एक नया गेमऑब्जेक्ट बनाएं और उसे नाम दें "Trigger"
- "Trigger" को "Tornado" गेमऑब्जेक्ट के अंदर ले जाएं और इसकी स्थिति को (0, 10, 0) में बदलें और इसके पैमाने को (60, 10, 60) में बदलें।
- "Trigger" गेमऑब्जेक्ट में मेशकोलाइडर घटक जोड़ें, Convex और IsTrigger चेकबॉक्स की जांच करें, और इसके मेश को डिफ़ॉल्ट सिलेंडर में बदलें
बवंडर अब तैयार है!
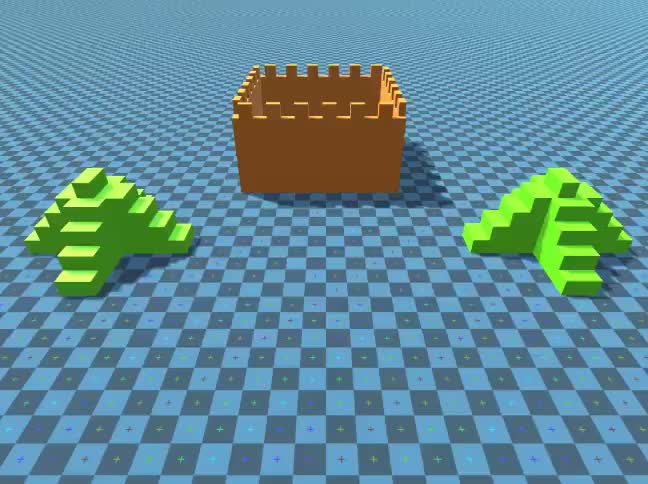
इसका परीक्षण करने के लिए बस एक क्यूब बनाएं और एक रिगिडबॉडी घटक जोड़ें, फिर इसे ट्रिगर क्षेत्र के अंदर रखें।
एक बार जब आप प्ले दबाते हैं तो क्यूब को बवंडर द्वारा खींच लिया जाना चाहिए:
