एकता में लक्ष्य सूचक
इस ट्यूटोरियल में, मैं दिखाऊंगा कि Unity में लक्ष्य संकेतक कैसे बनाया जाए। यह कोनों को निर्धारित करने के लिए कोलाइडर के बाउंडिंग बॉक्स का उपयोग करेगा।
तो चलिए शुरू करते हैं!
स्टेप 1
- एक नई स्क्रिप्ट बनाएं, इसे SC_TargetIndicator नाम दें, फिर नीचे दिए गए कोड को इसके अंदर पेस्ट करें:
SC_TargetIndicator.cs
using System.Collections;
using System.Collections.Generic;
using UnityEngine;

public class SC_TargetIndicator : MonoBehaviour
{
    public bool allowMultipleTargets = false;
    public Texture topLeftBorder;
    public Texture bottomLeftBorder;
    public Texture topRightBorder;
    public Texture bottomRightBorder;

    List<Collider> targets = new List<Collider>();
    Camera targetCamera;

    // Start is called before the first frame update
    void Start()
    {
        targetCamera = GetComponent<Camera>();
    }

    // Update is called once per frame
    void Update()
    {
        if (Input.GetMouseButtonUp(0))
        {
            Collider selectedCollider = GetTargetFromMouseClick();

            if (selectedCollider)
            {
                if (targets.Contains(selectedCollider))
                {
                    targets.Remove(selectedCollider);
                    return;
                }
                if (!allowMultipleTargets)
                {
                    targets.Clear();
                }
                targets.Add(selectedCollider);
            }
        }
    }

    Collider GetTargetFromMouseClick()
    {
        RaycastHit hitInfo = new RaycastHit();
        Ray ray = targetCamera.ScreenPointToRay(Input.mousePosition);
        bool hit = Physics.Raycast(ray, out hitInfo);
        if (hit)
        {
            return hitInfo.collider;
        }

        return null;
    }

    void OnGUI()
    {
        for(int i = 0; i < targets.Count; i++)
        {
            if (targets[i])
            {
                Vector3 boundPoint1 = targets[i].bounds.min;
                Vector3 boundPoint2 = targets[i].bounds.max;
                Vector3 boundPoint3 = new Vector3(boundPoint1.x, boundPoint1.y, boundPoint2.z);
                Vector3 boundPoint4 = new Vector3(boundPoint1.x, boundPoint2.y, boundPoint1.z);
                Vector3 boundPoint5 = new Vector3(boundPoint2.x, boundPoint1.y, boundPoint1.z);
                Vector3 boundPoint6 = new Vector3(boundPoint1.x, boundPoint2.y, boundPoint2.z);
                Vector3 boundPoint7 = new Vector3(boundPoint2.x, boundPoint1.y, boundPoint2.z);
                Vector3 boundPoint8 = new Vector3(boundPoint2.x, boundPoint2.y, boundPoint1.z);

                Vector2[] screenPoints = new Vector2[8];
                screenPoints[0] = targetCamera.WorldToScreenPoint(boundPoint1);
                screenPoints[1] = targetCamera.WorldToScreenPoint(boundPoint2);
                screenPoints[2] = targetCamera.WorldToScreenPoint(boundPoint3);
                screenPoints[3] = targetCamera.WorldToScreenPoint(boundPoint4);
                screenPoints[4] = targetCamera.WorldToScreenPoint(boundPoint5);
                screenPoints[5] = targetCamera.WorldToScreenPoint(boundPoint6);
                screenPoints[6] = targetCamera.WorldToScreenPoint(boundPoint7);
                screenPoints[7] = targetCamera.WorldToScreenPoint(boundPoint8);

                Vector2 topLeftPosition = Vector2.zero;
                Vector2 topRightPosition = Vector2.zero;
                Vector2 bottomLeftPosition = Vector2.zero;
                Vector2 bottomRightPosition = Vector2.zero;

                for (int a = 0; a < screenPoints.Length; a++)
                {
                    //Top Left
                    if(topLeftPosition.x == 0 || topLeftPosition.x > screenPoints[a].x)
                    {
                        topLeftPosition.x = screenPoints[a].x;
                    }
                    if (topLeftPosition.y == 0 || topLeftPosition.y > Screen.height - screenPoints[a].y)
                    {
                        topLeftPosition.y = Screen.height - screenPoints[a].y;
                    }
                    //Top Right
                    if (topRightPosition.x == 0 || topRightPosition.x < screenPoints[a].x)
                    {
                        topRightPosition.x = screenPoints[a].x;
                    }
                    if (topRightPosition.y == 0 || topRightPosition.y > Screen.height - screenPoints[a].y)
                    {
                        topRightPosition.y = Screen.height - screenPoints[a].y;
                    }
                    //Bottom Left
                    if (bottomLeftPosition.x == 0 || bottomLeftPosition.x > screenPoints[a].x)
                    {
                        bottomLeftPosition.x = screenPoints[a].x;
                    }
                    if (bottomLeftPosition.y == 0 || bottomLeftPosition.y < Screen.height - screenPoints[a].y)
                    {
                        bottomLeftPosition.y = Screen.height - screenPoints[a].y;
                    }
                    //Bottom Right
                    if (bottomRightPosition.x == 0 || bottomRightPosition.x < screenPoints[a].x)
                    {
                        bottomRightPosition.x = screenPoints[a].x;
                    }
                    if (bottomRightPosition.y == 0 || bottomRightPosition.y < Screen.height - screenPoints[a].y)
                    {
                        bottomRightPosition.y = Screen.height - screenPoints[a].y;
                    }
                }

                GUI.DrawTexture(new Rect(topLeftPosition.x - 16, topLeftPosition.y - 16, 16, 16), topLeftBorder);
                GUI.DrawTexture(new Rect(topRightPosition.x, topRightPosition.y - 16, 16, 16), topRightBorder);
                GUI.DrawTexture(new Rect(bottomLeftPosition.x - 16, bottomLeftPosition.y, 16, 16), bottomLeftBorder);
                GUI.DrawTexture(new Rect(bottomRightPosition.x, bottomRightPosition.y, 16, 16), bottomRightBorder);
            }
        }
    }
}
चरण दो
- MainCamera में SC_TargetIndicator स्क्रिप्ट संलग्न करें
- नीचे दिए गए images को बॉर्डर वेरिएबल्स पर असाइन करें (आयात करने के बाद उनके बनावट प्रकारों को 'Editor GUI and Legacy GUI' में बदलना सुनिश्चित करें)':
![]()
![]()
![]()
![]()

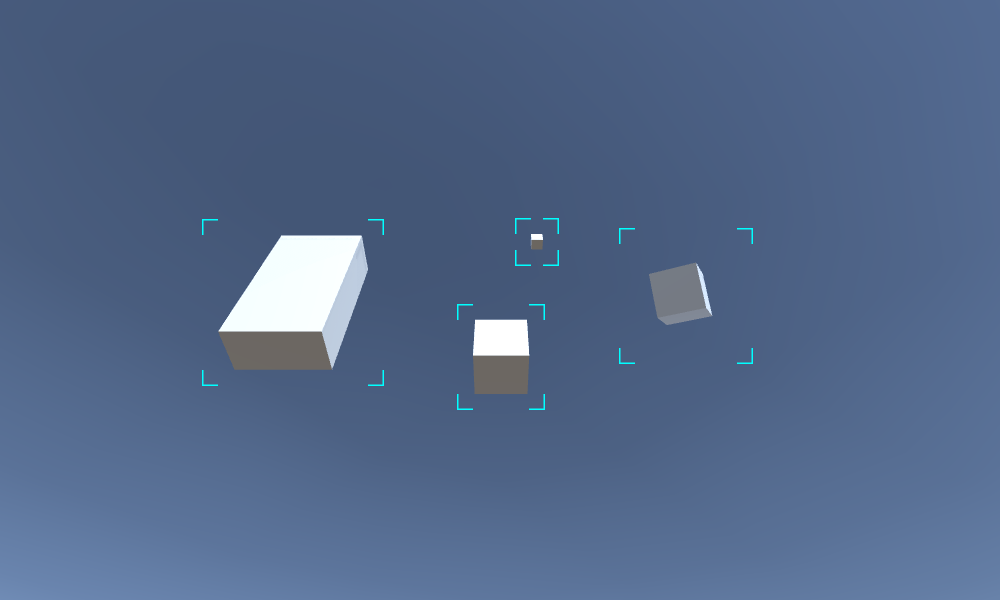
कुछ क्यूब बनाएं और उन्हें Camera के सामने रखें और फिर इसका परीक्षण करने के लिए Play दबाएँ।
लक्ष्य निर्दिष्ट करने के लिए क्यूब्स पर क्लिक करें।