एकता मोबाइल टच कंट्रोल कैसे बनाएं
नियंत्रण वीडियो गेम के सबसे महत्वपूर्ण हिस्सों में से एक हैं, और इसमें कोई आश्चर्य की बात नहीं है, यह खिलाड़ियों को गेम की दुनिया के साथ बातचीत करने की अनुमति देता है।
गेम नियंत्रण सिग्नल होते हैं जो हार्डवेयर इंटरेक्शन (माउस/कीबोर्ड, कंट्रोलर, टचस्क्रीन इत्यादि) के माध्यम से भेजे जाते हैं जिन्हें कुछ क्रियाओं को लागू करके गेम कोड द्वारा संसाधित किया जाता है।
पीसी और गेमिंग कंसोल में भौतिक बटन होते हैं जिन्हें दबाया जा सकता है, हालांकि, आधुनिक मोबाइल उपकरणों में केवल कुछ भौतिक बटन होते हैं, बाकी इंटरैक्शन टच जेस्चर के माध्यम से किया जाता है। जिसका मतलब है कि गेम बटन को स्क्रीन पर प्रदर्शित किया जाना चाहिए। इसीलिए मोबाइल गेम बनाते समय, इसे उपयोगकर्ता के अनुकूल और अव्यवस्था-मुक्त रखते हुए स्क्रीन पर सभी बटन होने के बीच संतुलन बनाना महत्वपूर्ण है।
इस ट्यूटोरियल में, मैं दिखाऊंगा कि यूआई कैनवास का उपयोग करके Unity में पूर्ण-विशेषताओं वाले (जॉयस्टिक और बटन) मोबाइल नियंत्रण कैसे बनाएं।
चरण 1: सभी आवश्यक स्क्रिप्ट बनाएं
इस ट्यूटोरियल में 2 स्क्रिप्ट हैं, SC_ClickTracker.cs, और SC_MobileControls.cs। पहली स्क्रिप्ट क्लिक इवेंट को सुनेगी और दूसरी स्क्रिप्ट इवेंट से उत्पन्न मूल्यों को पढ़ेगी।
SC_ClickTracker.cs
using System.Collections;
using System.Collections.Generic;
using UnityEngine;
using UnityEngine.EventSystems;

#if UNITY_EDITOR
using UnityEditor;
#endif

public class SC_ClickTracker : MonoBehaviour, IPointerDownHandler, IDragHandler, IPointerUpHandler
{
    public string buttonName = ""; //This should be an unique name of the button
    public bool isJoystick = false;
    public float movementLimit = 1; //How far the joystick can be moved (n x Joystick Width)
    public float movementThreshold = 0.1f; //Minimum distance (n x Joystick Width) that the Joystick need to be moved to trigger inputAxis (Must be less than movementLimit)

    //Reference variables
    RectTransform rt;
    Vector3 startPos;
    Vector2 clickPos;

    //Input variables
    Vector2 inputAxis = Vector2.zero;
    bool holding = false;
    bool clicked = false;

    void Start()
    {
        //Add this button to the list
        SC_MobileControls.instance.AddButton(this);

        rt = GetComponent<RectTransform>();
        startPos = rt.anchoredPosition3D;
    }

    //Do this when the mouse is clicked over the selectable object this script is attached to.
    public void OnPointerDown(PointerEventData eventData)
    {
        //Debug.Log(this.gameObject.name + " Was Clicked.");

        holding = true;

        if (!isJoystick)
        {
            clicked = true;
            StartCoroutine(StopClickEvent());
        }
        else
        {
            //Initialize Joystick movement
            clickPos = eventData.pressPosition;
        }
    }

    WaitForEndOfFrame waitForEndOfFrame = new WaitForEndOfFrame();

    //Wait for next update then release the click event
    IEnumerator StopClickEvent()
    {
        yield return waitForEndOfFrame;

        clicked = false;
    }

    //Joystick movement
    public void OnDrag(PointerEventData eventData)
    {
        //Debug.Log(this.gameObject.name + " The element is being dragged");

        if (isJoystick)
        {
            Vector3 movementVector = Vector3.ClampMagnitude((eventData.position - clickPos) / SC_MobileControls.instance.canvas.scaleFactor, (rt.sizeDelta.x * movementLimit) + (rt.sizeDelta.x * movementThreshold));
            Vector3 movePos = startPos + movementVector;
            rt.anchoredPosition = movePos;

            //Update inputAxis
            float inputX = 0;
            float inputY = 0;
            if (Mathf.Abs(movementVector.x) > rt.sizeDelta.x * movementThreshold)
            {
                inputX = (movementVector.x - (rt.sizeDelta.x * movementThreshold * (movementVector.x > 0 ? 1 : -1))) / (rt.sizeDelta.x * movementLimit);
            }
            if (Mathf.Abs(movementVector.y) > rt.sizeDelta.x * movementThreshold)
            {
                inputY = (movementVector.y - (rt.sizeDelta.x * movementThreshold * (movementVector.y > 0 ? 1 : -1))) / (rt.sizeDelta.x * movementLimit);
            }
            inputAxis = new Vector2(inputX, inputY);
        }
    }

    //Do this when the mouse click on this selectable UI object is released.
    public void OnPointerUp(PointerEventData eventData)
    {
        //Debug.Log(this.gameObject.name + " The mouse click was released");

        holding = false;

        if (isJoystick)
        {
            //Reset Joystick position
            rt.anchoredPosition = startPos;
            inputAxis = Vector2.zero;
        }
    }

    public Vector2 GetInputAxis()
    {
        return inputAxis;
    }

    public bool GetClickedStatus()
    {
        return clicked;
    }

    public bool GetHoldStatus()
    {
        return holding;
    }
}

#if UNITY_EDITOR
//Custom Editor
[CustomEditor(typeof(SC_ClickTracker))]
public class SC_ClickTracker_Editor : Editor
{
    public override void OnInspectorGUI()
    {
        SC_ClickTracker script = (SC_ClickTracker)target;

        script.buttonName = EditorGUILayout.TextField("Button Name", script.buttonName);
        script.isJoystick = EditorGUILayout.Toggle("Is Joystick", script.isJoystick);
        if (script.isJoystick)
        {
            script.movementLimit = EditorGUILayout.FloatField("Movement Limit", script.movementLimit);
            script.movementThreshold = EditorGUILayout.FloatField("Movement Threshold", script.movementThreshold);
        }
    }
}
#endif
SC_MobileControls.cs
using System.Collections;
using System.Collections.Generic;
using UnityEngine;
public class SC_MobileControls : MonoBehaviour
{
[HideInInspector]
public Canvas canvas;
List<SC_ClickTracker> buttons = new List<SC_ClickTracker>();
public static SC_MobileControls instance;
void Awake()
{
//Assign this script to static variable, so it can be accessed from other scripts. Make sure there is only one SC_MobileControls in the Scene.
instance = this;
canvas = GetComponent<Canvas>();
}
public int AddButton(SC_ClickTracker button)
{
buttons.Add(button);
return buttons.Count - 1;
}
public Vector2 GetJoystick(string joystickName)
{
for(int i = 0; i < buttons.Count; i++)
{
if(buttons[i].buttonName == joystickName)
{
return buttons[i].GetInputAxis();
}
}
Debug.LogError("Joystick with a name '" + joystickName + "' not found. Make sure SC_ClickTracker is assigned to the button and the name is matching.");
return Vector2.zero;
}
public bool GetMobileButton(string buttonName)
{
for (int i = 0; i < buttons.Count; i++)
{
if (buttons[i].buttonName == buttonName)
{
return buttons[i].GetHoldStatus();
}
}
Debug.LogError("Button with a name '" + buttonName + "' not found. Make sure SC_ClickTracker is assigned to the button and the name is matching.");
return false;
}
public bool GetMobileButtonDown(string buttonName)
{
for (int i = 0; i < buttons.Count; i++)
{
if (buttons[i].buttonName == buttonName)
{
return buttons[i].GetClickedStatus();
}
}
Debug.LogError("Button with a name '" + buttonName + "' not found. Make sure SC_ClickTracker is assigned to the button and the name is matching.");
return false;
}
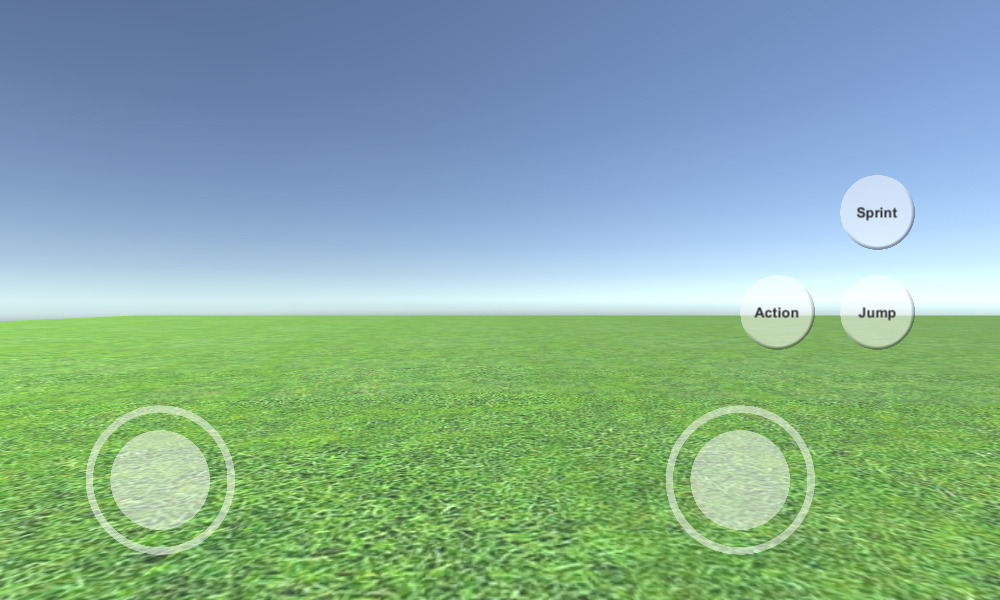
}चरण 2: मोबाइल नियंत्रण सेट करें
- एक नया कैनवास बनाएं (गेमऑब्जेक्ट -> यूआई -> कैनवास)
- कैनवास स्केलर में 'UI Scale Mode' को 'Scale With Screen Size' में बदलें और जिसके साथ आप काम कर रहे हैं उसका संदर्भ रिज़ॉल्यूशन बदलें (मेरे मामले में यह 1000 x 600 है)
- कैनवास ऑब्जेक्ट में SC_MobileControls स्क्रिप्ट संलग्न करें
- कैनवास ऑब्जेक्ट -> यूआई -> इमेज पर राइट-क्लिक करें
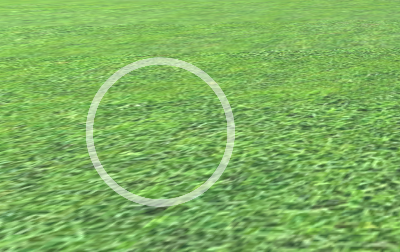
- नव निर्मित छवि का नाम बदलें "JoystickLeft"
- "JoystickLeft" स्प्राइट को एक खाली सर्कल में बदलें (इसे Unity में आयात करने के बाद टेक्सचर प्रकार को 'Sprite (2D and UI)' में बदलना न भूलें)

- "JoystickLeft" रेक्ट ट्रांसफ़ॉर्म मान को नीचे दिए गए स्क्रीनशॉट के समान सेट करें:

- छवि घटक में, स्प्राइट को थोड़ा पारदर्शी बनाने के लिए रंग अल्फा को 0.5 पर सेट करें:
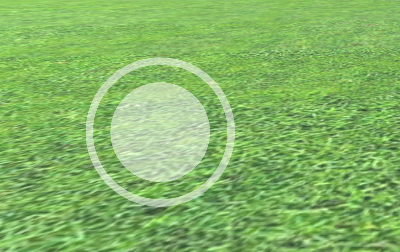
- "JoystickLeft" ऑब्जेक्ट को डुप्लिकेट करें और उसका नाम बदलें "JoystickLeftButton"
- "JoystickLeftButton" को "JoystickLeft" ऑब्जेक्ट के अंदर ले जाएं
- "JoystickLeftButton" स्प्राइट को भरे हुए गोले में बदलें:

- "JoystickLeftButton" रेक्ट ट्रांसफ़ॉर्म मान को नीचे स्क्रीनशॉट के समान सेट करें:

- इसमें बटन घटक जोड़ें "JoystickLeftButton"
- बटन घटक में ट्रांज़िशन को बदलें 'None'
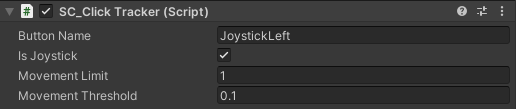
- इसमें SC_ClickTracker स्क्रिप्ट संलग्न करें "JoystickLeftButton"
- SC_ClickTracker में बटन नाम को किसी भी अद्वितीय नाम पर सेट करें (मेरे मामले में मैंने इसे 'JoystickLeft' पर सेट किया है) और 'Is Joystick' चेकबॉक्स को सक्षम करें।
जॉयस्टिक बटन तैयार है. आपके पास किसी भी संख्या में जॉयस्टिक हो सकते हैं (मेरे मामले में मेरे पास 2 होंगे, एक बाईं ओर गति को नियंत्रित करने के लिए और एक दाईं ओर रोटेशन को नियंत्रित करने के लिए)।
- "JoystickLeft" का डुप्लिकेट बनाएं और इसका नाम बदलें "JoystickRight"
- "JoystickRight" का विस्तार करें और "JoystickLeftButton" का नाम बदलें "JoystickRightButton"
- "JoystickRight" रेक्ट ट्रांसफ़ॉर्म मान को नीचे स्क्रीनशॉट के समान सेट करें:
- "JoystickRightButton" ऑब्जेक्ट का चयन करें और SC_ClickTracker में बटन का नाम बदलें 'JoystickRight'
दूसरा जॉयस्टिक तैयार है.
अब आइए एक नियमित बटन बनाएं:
- कैनवास ऑब्जेक्ट -> यूआई -> बटन पर राइट-क्लिक करें
- बटन ऑब्जेक्ट का नाम बदलें "SprintButton"
- "SprintButton" स्प्राइट को बेवल प्रभाव वाले सर्कल में बदलें:

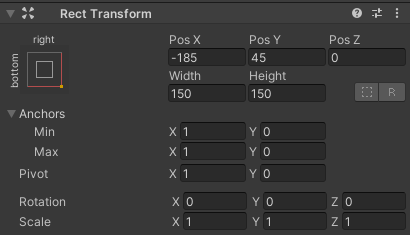
- "SprintButton" रेक्ट ट्रांसफ़ॉर्म मान को नीचे स्क्रीनशॉट के समान सेट करें:

- "SprintButton" छवि रंग अल्फा को 0.5 में बदलें
- SC_ClickTracker स्क्रिप्ट को "SprintButton" ऑब्जेक्ट में संलग्न करें
- SC_ClickTracker में बटन का नाम बदलें 'Sprinting'
- "SprintButton" के अंदर टेक्स्ट ऑब्जेक्ट का चयन करें और इसके टेक्स्ट को 'Sprint' में बदलें, फ़ॉन्ट आकार को भी बदलें 'Bold'
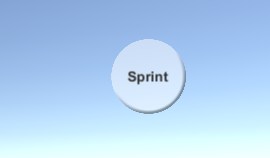
बटन तैयार है.
हम "Jump" नामक एक और बटन बनाने जा रहे हैं:
- "SprintButton" ऑब्जेक्ट को डुप्लिकेट करें और उसका नाम बदलें "JumpButton"
- "JumpButton" Pos Y मान को 250 में बदलें
- SC_ClickTracker में बटन का नाम बदलें 'Jumping'
- "JumpButton" के अंदर टेक्स्ट को बदलें 'Jump'
और अंतिम बटन "Action" है:
- "JumpButton" ऑब्जेक्ट को डुप्लिकेट करें और उसका नाम बदलें "ActionButton"
- "ActionButton" Pos X मान को -185 में बदलें
- SC_ClickTracker में बटन का नाम बदलें 'Action'
- "ActionButton" के अंदर टेक्स्ट को बदलें 'Action'
चरण 3: मोबाइल नियंत्रण लागू करें
यदि आपने उपरोक्त चरणों का पालन किया है, तो अब आप अपनी स्क्रिप्ट में मोबाइल नियंत्रण लागू करने के लिए इन फ़ंक्शन का उपयोग कर सकते हैं:
if(SC_MobileControls.instance.GetMobileButtonDown("BUTTON_NAME")){
	//Mobile button has been pressed one time, equivalent to if(Input.GetKeyDown(KeyCode...))
}

if(SC_MobileControls.instance.GetMobileButton("BUTTON_NAME")){
	//Mobile button is being held pressed, equivalent to if(Input.GetKey(KeyCode...))
}

//Get normalized direction of a on-screen Joystick
//Could be compared to: new Vector2(Input.GetAxis("Horizontal"), Input.GetAxis("Vertical")) or new Vector2(Input.GetAxis("Mouse X"), Input.GetAxis("Mouse Y"))
Vector2 inputAxis = SC_MobileControls.instance.GetJoystick("JOYSTICK_NAME");
उदाहरण के तौर पर, मैं इस ट्यूटोरियल से एक एफपीएस नियंत्रक के साथ मोबाइल नियंत्रण लागू करूंगा। पहले उस ट्यूटोरियल का अनुसरण करें, यह काफी सरल है।
यदि आपने उस ट्यूटोरियल का अनुसरण किया है तो अब आपके पास मोबाइल नियंत्रण के साथ कैनवास के साथ "FPSPlayer" ऑब्जेक्ट होगा।
हम मोबाइल नियंत्रणों को लागू करने के साथ-साथ डेस्कटॉप नियंत्रणों को भी संरक्षित रखेंगे, जिससे इसे क्रॉस-प्लेटफ़ॉर्म बनाया जा सके:
- SC_FPSController स्क्रिप्ट खोलें, पंक्ति 28 तक स्क्रॉल करें, और इस भाग को हटा दें (उस भाग को हटाने से कर्सर लॉक होने से बच जाएगा और संपादक में मोबाइल नियंत्रण पर क्लिक करने की अनुमति मिल जाएगी।):
        // Lock cursor
        Cursor.lockState = CursorLockMode.Locked;
Cursor.visible = false;- लाइन 39 तक स्क्रॉल करें और बदलें:
        bool isRunning = Input.GetKey(KeyCode.LeftShift);
        float curSpeedX = canMove ? (isRunning ? runningSpeed : walkingSpeed) * Input.GetAxis("Vertical") : 0;
float curSpeedY = canMove ? (isRunning ? runningSpeed : walkingSpeed) * Input.GetAxis("Horizontal") : 0;- साथ:
        bool isRunning = Input.GetKey(KeyCode.LeftShift) || SC_MobileControls.instance.GetMobileButton("Sprinting");
        float curSpeedX = canMove ? (isRunning ? runningSpeed : walkingSpeed) * (Input.GetAxis("Vertical") + SC_MobileControls.instance.GetJoystick("JoystickLeft").y) : 0;
float curSpeedY = canMove ? (isRunning ? runningSpeed : walkingSpeed) * (Input.GetAxis("Horizontal") + SC_MobileControls.instance.GetJoystick("JoystickLeft").x) : 0;- लाइन 45 तक नीचे स्क्रॉल करें और बदलें:
if (Input.GetButton("Jump") && canMove && characterController.isGrounded)- साथ:
if ((Input.GetButton("Jump") || SC_MobileControls.instance.GetMobileButtonDown("Jumping")) && canMove && characterController.isGrounded)- पंक्ति 68 तक नीचे स्क्रॉल करें और बदलें:
            rotationX += -Input.GetAxis("Mouse Y") * lookSpeed;
            rotationX = Mathf.Clamp(rotationX, -lookXLimit, lookXLimit);
            playerCamera.transform.localRotation = Quaternion.Euler(rotationX, 0, 0);
transform.rotation *= Quaternion.Euler(0, Input.GetAxis("Mouse X") * lookSpeed, 0);- साथ:
#if UNITY_IPHONE || UNITY_ANDROID || UNITY_EDITOR
            rotationX += -(SC_MobileControls.instance.GetJoystick("JoystickRight").y) * lookSpeed;
#else
            rotationX += -Input.GetAxis("Mouse Y") * lookSpeed;
#endif
            rotationX = Mathf.Clamp(rotationX, -lookXLimit, lookXLimit);
            playerCamera.transform.localRotation = Quaternion.Euler(rotationX, 0, 0);
#if UNITY_IPHONE || UNITY_ANDROID || UNITY_EDITOR
            transform.rotation *= Quaternion.Euler(0, SC_MobileControls.instance.GetJoystick("JoystickRight").x * lookSpeed, 0);
#else
            transform.rotation *= Quaternion.Euler(0, Input.GetAxis("Mouse X") * lookSpeed, 0);
#endif
चूँकि लुक मूवमेंट संपादक में जॉयस्टिक परीक्षण में हस्तक्षेप करेगा, हम मोबाइल लॉजिक को बाकी प्लेटफार्मों से अलग करने के लिए प्लेटफॉर्म-विशिष्ट संकलन के लिए #if का उपयोग कर रहे हैं।
मोबाइल एफपीएस नियंत्रक अब तैयार है, आइए इसका परीक्षण करें:

जैसा कि आप देख सकते हैं, सभी जॉयस्टिक और बटन कार्यात्मक हैं ("Action" बटन को छोड़कर, जिसे इसके लिए उपयुक्त सुविधा नहीं होने के कारण लागू नहीं किया गया था)।